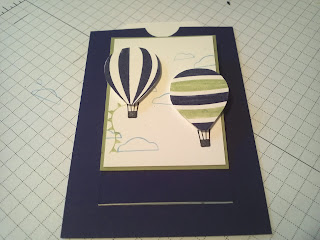
I designed this card using the concept from Beate's tutorial found here at http://www.splitcoaststampers.com/resources/tutorials/surprise_pop_up_card
and then changed the dimensions a little. A super fun card to make and give.
Here is MY tutorial.
I recommend reading through the tutorial before you start as it will probably make more sense as you work through it.
The card base is made from 'Crumb Cake'. You will then need:
1 piece of 'Concorde Crush' 3" x 4 1/4"
1 piece 'Bashful Blue' 2 7/8" x 4 1/8"
1 piece of 'Whisper White' 2 3/8" x 4" (Tag)
1 piece of 'Whisper White' 1 7/8" x 2 5/8"
1 piece of 'Pear Pizzazz' 2" x 2 3/4"
I used the stamp set 'Up, Up and Away'
Take the 'Concorde Crush' piece and mark 1/2" on all sides. This will be your back piece so don't worry about the lines.
2 3/8 & 3 3/4". Your piece should now look like this. I erased the pencil lines on mine so it wouldn't look confusing.
Fold your score lines and your piece of cardstock should now look like this. Set aside.
Cut 2 corners off of your piece of Whisper White designated to be your tag.
To help guide the tag as it is pulled in and out I did add the copy paper piece that Beate recommended in her tutorial. I made one card without and it didn't slide as nicely. What you will want to do is cut a piece of plain computer paper about 1/2" wide by 5 1/2". Adhere on your piece of Concorde Crush as shown but only to the width of the tag.
Lay your tag piece over the strip and fold over the 2 pieces of PC paper.
Stick the 2 edges together. Do not tape down onto the tag. The PC paper is just a guide so your tag will need to be able to move up and down through it.
Add sticky strip to lower scored piece as shown.
Remove backing and adhere, matching the lower edge of the tag with open edge of Concorde Crush.
Slide the tag out of the guide so that you can use a circle punch at the top to create a notch. Punch through cardstock and the PC paper. Re-insert the tag into the guide. It should now look like this.
Apply sticky strip on the 2 sides and bottom around the tag. Remove backing.
Adhere the piece of bashful blue.
Turn over and time to work on the front.
For the balloons, use your markers and colour directly on your stamp. Using the side of the broad end is usually easier. I used markers in Concorde Crush and Pear Pizzazz. After colouring your stamp, give it a quick huff with your breath to make sure all the ink is still wet and then stamp on a scrap piece of whisper white cardstock.
Cut around the edges of both your balloons.
Grab your smaller piece of whisper white that you cut previously and lay your balloons where you would like them to be. Don't stick them down yet. Use a pencil to 'guess-timate' where your baskets will go.
Stamp your baskets, clouds and flag stings.
Attach your balloons with a couple Stampin' Dimensionals.
Tape or adhere your balloon piece onto the Pear Pizzazz piece you cut earlier.
Grab your Concorde Crush piece again and apply Sticky Strip on the middle part only as shown.
Adhere the balloon piece. The bottom edge should line up to the folded edge not the cut edge.
Time to add the sentiment stamp. Pull your tag up to expose the bashful blue cardstock and stamp.
Slide shut again. Punch a hole at the top of the tag. Tie a piece of Pear Pizzazz seam binding.
Turn over and apply sticky strip to the 4 sides. Remove backing.
Place on the front of your Crumb Card cardstock. Press down to make sure adhered well.
And you are done!


