Monday, January 19, 2015

Valentine's Day Chocolate Box Tutorial


After getting quite a few requests for a tutorial for this little box, I thought it was time to put it on my blog. Sorry for the delay for those who have been waiting.

.For the box itself you will need:
Cardstock (1) 8 1/4" X 4 1/2"
           (1) 4 1/2" X 3"
                 (2) 4 1/2" X 1 1/2"

Co-ordinating Cardstock, Designer Series Paper, Ribbon, Adhesive

Finished size of the box is 3" X 3" X 3/4"


Starting with the largest piece (using Real Red here),
 on the long side, score at 3/4", 3 3/4", 4 1/2" & 7 1/2".
 Turn 90 degrees and score at 3/4" & 3 3/4"


Your piece should now look like this.


Cut on the solid lines. 
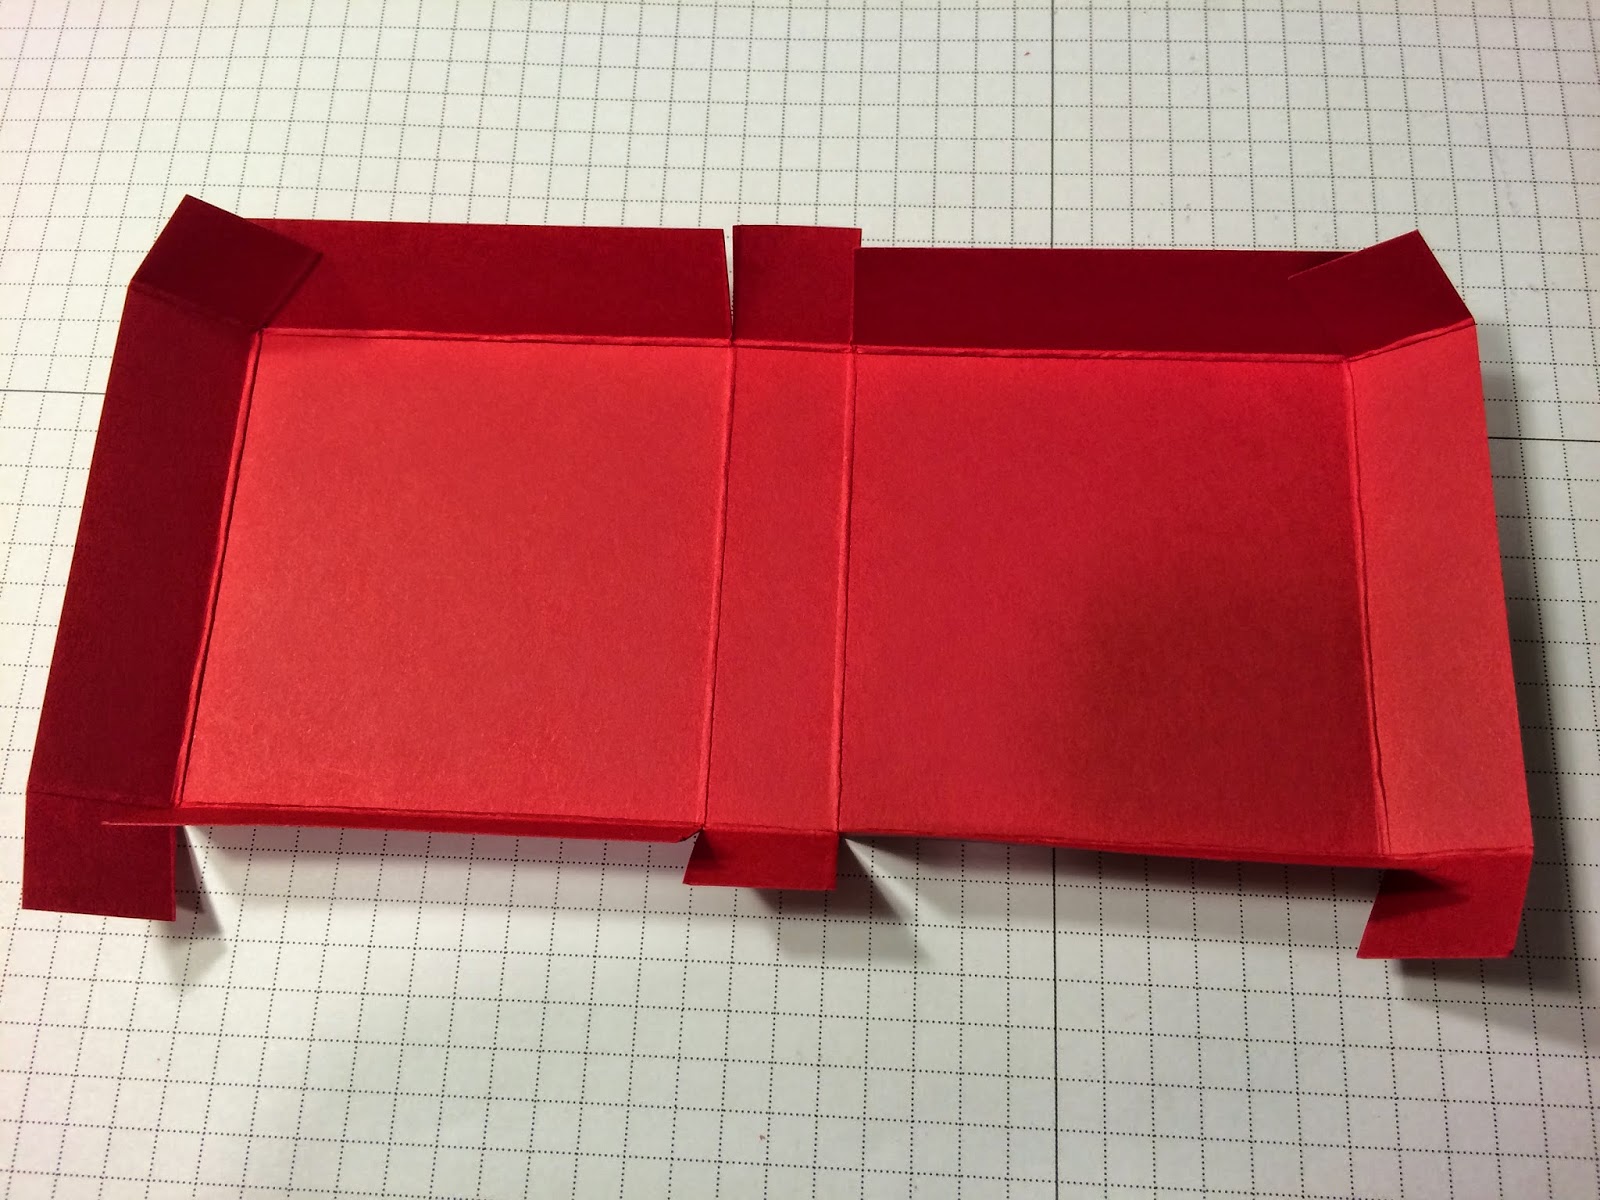

And fold like so.


Decorate the front of your box before adhering anything together. I used the set 'You Plus Me' from the new Stampin' Up! Occasions catalog. The designer series paper is 'Stacked with Love'.


Add adhesive as shown. You will want to use a fairly strong adhesive so the box stays together. Sticky Strip is also good.


Fold the tabs in like this.


And this, to form the bottom part of the box. Finish the last 2 corners of the top of the lid this way also.


If you get any uneven edges like this, just get a pair of scissors and snip it off.


Now you should be able to close your box. The lid edges will sit over the top of the box.


Now its time to make the inside. Open the box up again.


Start with the bigger piece that's 4 1/2" x 3"

Score at 1 1/2", 2 1/4" & 3
Fold like so.


Adhere the middle fold together


Place in box. Test it out before sticking it in. Sometimes you need to cut a sliver off the edges for it to fit nicely.


Now, grab the other 2 smaller pieces. Score in the same manner. 1 1/2", 2 1/4" & 3


Stick the middle fold together just like before


Place and stick in box. Again test out first.


The inside of your box should now look like this.


If you would like to decorate the inside, cut or punch 4 squares from Designer Series Paper a smidge smaller than 1 1/2" and adhere.


Add Chocolate. Reece's Chocolate Buttercup Hearts work perfect. Dove Hearts would work well also.


Add ribbon if you like and you are all good!


Monday, January 12, 2015

Valentine's Day Free Standing Pop-Up Card


Here is the card we made at a tonight's Stampin' Up home class. This guy is just too cute. He is in one of the Valentine's Day sets in the NEW Occasions catalog called 'Wood you be mine?'. The card is a free standing pop up card. I found the instructions on how to make one HERE.


I used the fine end of my marker to make these extra lines on his shirt.


In the final picture you can see how the card lays flat for mailing.


Sunday, October 26, 2014

Gentle Peace Stained Glass Window Card


I love a successful stamping day!
This is the NEW Photopolymer set 'Gentle Peace'. I stamped the image with Stazon on vellum, flipped it over and then coloured in the 'stained glass' with Blendability pens.
I then stamped the same image to the front of the card and cut out the outside edge leaving a hole to adhere the image from the back. I will probably do a tutorial of this one although its not too tricky to figure out. 
I am in love with how well this turned out. Thinking this will be one of the cards we mail out this year. Adding a battery operated candle just makes it look even more awesome.


Wednesday, August 27, 2014

Kind Koala


I knew this stamp set was going to be fun. Finally an Aussie themed stamp set I can play with! Yay!
Smoky Slate is the perfect koala colour IMO. I stamped 'him' on the cardstock with Stazon and just cut him out. I love 'fussy cutting'. Much easier than colouring sometimes. I used Basic Grey for a little added depth and Daffodil Delight to add a pop of colour. The koala is popped up with Dimensionals to help him stand out a bit. He is just too cute!

Sunday, August 17, 2014

Holiday Catalog Sneak Peek #2 - Festival of Trees

I am having SO much fun with this set. I have pretty much a million ideas with what I could do with it.
Available in the Holiday Catalog August 28th. The 'Festival of Trees' set also has a coordinating punch just to make life a little bit easier. The red ornaments on the tree are the little half pearls 'painted' with a Cherry Cobbler Blendability marker.


Here is another design. The colour used is Lost Lagoon.


And this one... I'm still going..


Sunday, August 10, 2014

Holiday Catalog Sneak Peek #1

I love being a Stampin' Up! demonstrator! One of my most favourite things is being able to order and play with stamps and products before the catalogs are released. I especially get excited for the Holiday stamps.
I know its a bit early, but I couldn't wait to play with a couple Christmas sets. Products from the Holiday Catalog will be available for purchase August 28th 2014.


This cute Santa comes from a set called 'Get Your Santa On'. Blendabilities work perfectly for colouring this guy in. The stars embossing folder is also new.


One of my favourite sets from last year made a come back to my excitement. Endless Wishes was a set released individually that had sold out. Both of these sets are Photopolymer.
I still have a couple more sets I haven't had the chance to play with yet so stay tuned.
 If you would like to follow me on my Facebook page click HERE.

Sunday, July 6, 2014

A Baby Girl Card


This card was made for a dear friend who is having a baby. 
I made the card to match her nursery and am pretty happy with how it turned out.

Stamp Sets; Zoo Babies
                                                                  Positively Chevron (background stamp set)
Card Stock: Smoky Slate
                 Basic Grey
                     Pink Pirouette
                      Whisper White
Ink Pads:    Smoky Slate
                     Pink Pirouette